http://northernhomestead.com/how-to-build-a-geodome-greenhouse/
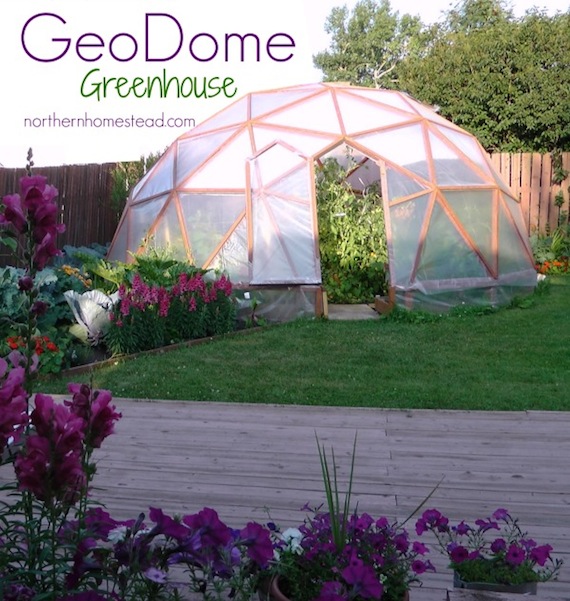
How to Build a GeoDome Greenhouse
March 6, 2013 · by Jakob ·
When
it comes to gardening in colder climates, a greenhouse is almost a must have.
It extends the growing season and gives the plants a lot more heat. With a
greenhouse, we can actually pick ripe tomatoes here and grow some plants that
we would not be able to without one. A greenhouse can also be a great place to
hang out on those cool spring days and summer nights. When we started to look
out for one to build, our expectations were very high. In a northern garden we
have to deal with frost, nasty winds and hail, and also loads
of snow in the winter. Our days in spring and fall don’t have much direct
sunlight so we need to catch every sunbeam we can. Plus, we live in town and
the greenhouse in our small back yard needed to be somehow catchy. In our
research we came across the GeoDome greenhouse:
Very
unique, lightweight structure
Stable in wind and under snow
Optimal light absorption
Has the most growing ground space
A unique hang-out place
An eye catcher
The
GeoDome greenhouse seemed to be just what we were
looking for. Since there is no foundation and this structure can be portable or
temporary, we did not need any permits and would be able to take it with us if
we would move. So it’s all good! But … How to build a GeoDome greenhouse?
What
materials to use? What plan to go by? What tools needed? How to do the cutting?
How to assemble the GeoDome? How to cover the GeoDome?
We
looked at dozens of how-to instructions and even bought a pricy e-Book (with very
little value). But all together it helped us build the GeoDome
we have and love. Thanks to my dear husband, who did all the researching and building.
Here
we share our GeoDome building experience for anyone
who wants to build a GeoDome
Materials to use
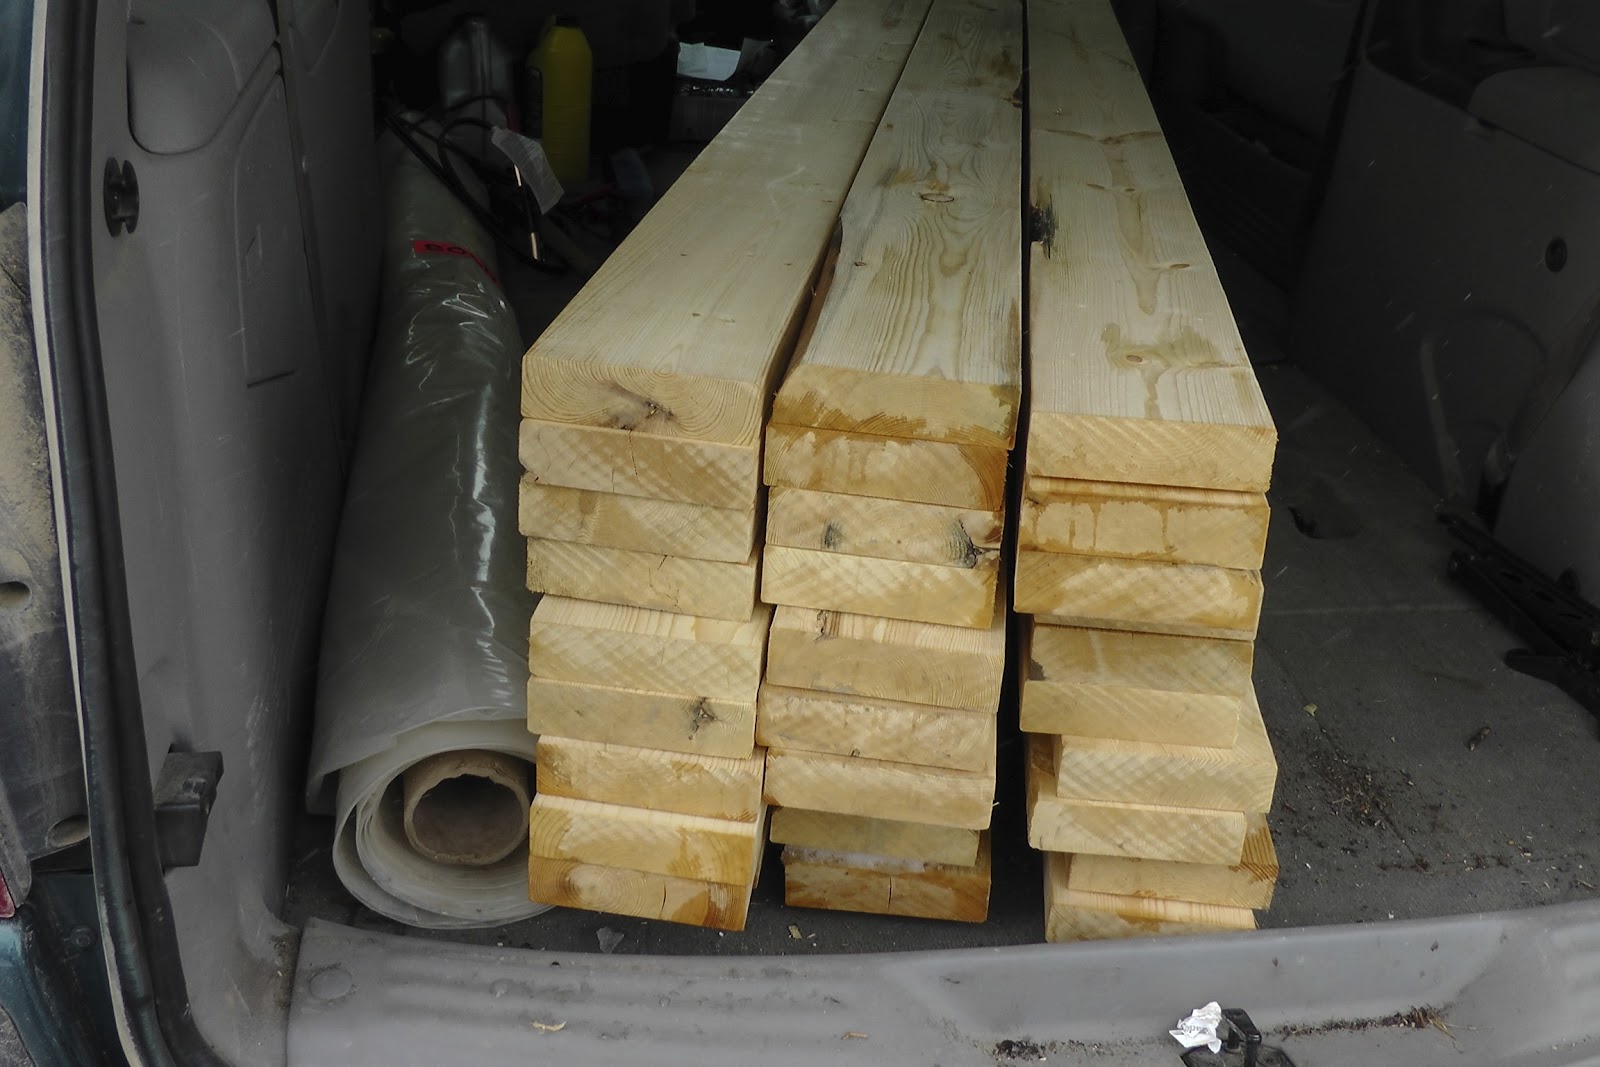
-Wood.
We used untreated spruce lumber, and stained it before assembling. You could
also use Douglas Fir which is more durable.
- Screws, about a pound
- Covering. We used greenhouse plastic that was given to us from a commercial
greenhouse. Plastic from a commercial greenhouse can be easily reused on a
dome, since there is not so much pressure on it, and it can last another 3-5
years. You can also cover the dome with shrink foil, polycarbonate, or bubble Solawrap™ foil.
- Automatic window openers and hinges for the door and the windows.

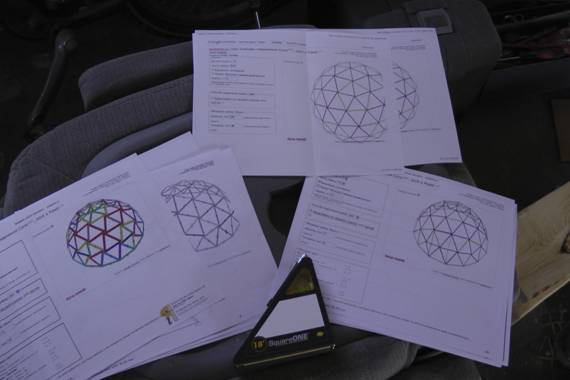
GeoDome Greenhouse plans
Acidome is one of the best Geodome calculators we were
able to find on the internet. Although it’s in Russian it can be translated
using Google Translate at the top of the page. The Geodesic frequency for a
Dome can be 2V, 3V, 4V. A smaller dome can have a lower frequency; for our
18′ dome we chose the 3V frequency. Anything bigger then 18′ should
be 4V. Keep also in mind that whatever the width of dome is, it will be half
that in height. For example, our 18′ dome is 9′ high plus the 1′
pony wall.
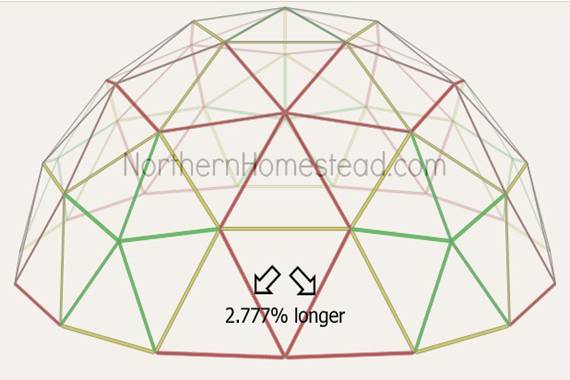
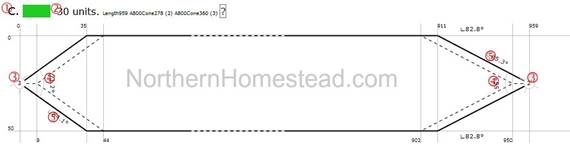
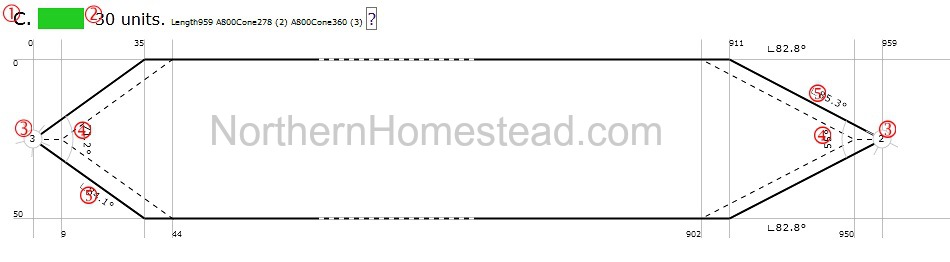
The
challenge with a 3V Dome is that the red struts at the bottom of the dome as
shown above are 2.777% longer then all other red struts. Most plans on the
internet do not do this little adjustment and end up with an uneven bottom.
Sure, it is possible to level the foundation, but much easier to adjust the
length of the 10 red struts on the bottom, always in between the pentagons. Why
did we go with 3V even though it is the more complicated version? We had a spot
for an 18′ dome. To have that size in 2V would make the triangles too big
and too small with 4V. If you want to avoid the problem of leveling
in a 3V dome and have the space, go with a bigger size in 4V frequency! Once we
had the plan, we printed it out in color so it was helpful on the job site.
Tools needed
-
measuring tape
- square
- pencil
- safety glasses
- hearing protection
- drill
- radial arm saw or dual bevel miter saw
- level
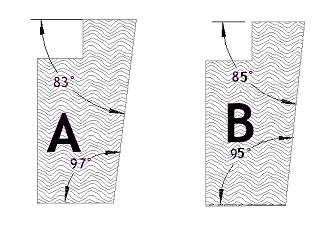
Cutting the struts
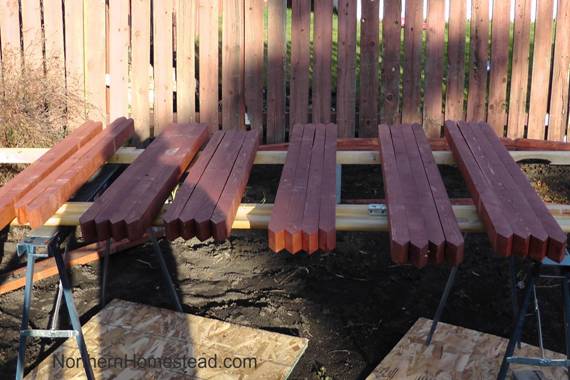
First
we had to cut the 2x6s to 2″ wide struts. Your lumber store might be
willing to do this for you. Ideally, a radial arm saw is preferred because it
can make very precise cuts, even compound cuts for each strut. We used a miter saw with the stops removed and it also did a good job
– precision is key with timber struts. And because
precision is important to us we went with the metric system. Here’s the link
for our dome size:Acidome.ru
How to use the Acidome.ru
calculator?
1.
Alphabetic index of the struts
2.
Number of struts of this type
3.
The numeric designation size vertex to which this edge
rests on this end
4.
The value of a flat angle to the plane of the outer edge
5.
The value of the dihedral angle between the outer plane of
the edge and the plane of the cut
Here’s a graphic
of the end of a strut in 3D.
Finished struts:
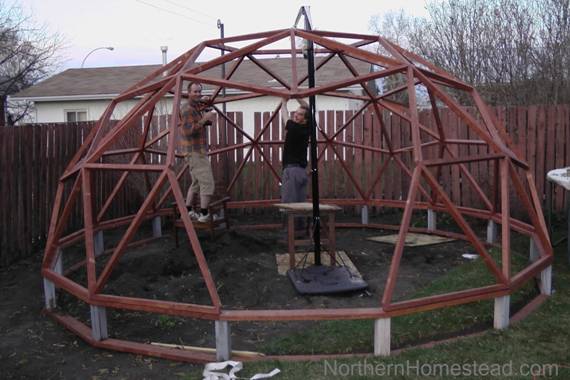
First we built a
1 foot high pony wall. With a pony wall you will gain some height, especially
for a small dome it can be very important. Some users make a pony wall up to 3
feet high.

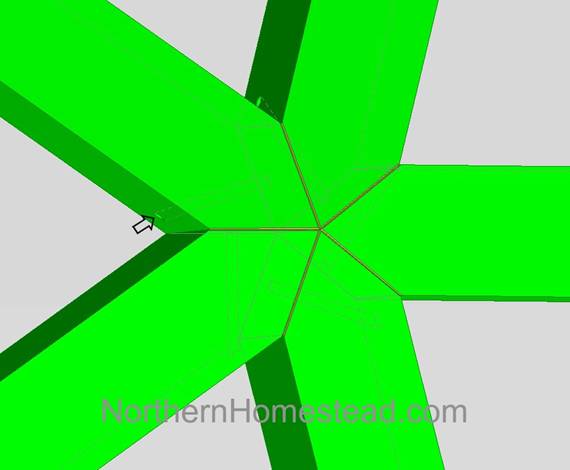
Now we started
assembling the dome. It’s a bit like playing Lego on a bigger scale, following
the plan. The struts are all joined using a miter
joint and are held in place by screws as indicated on the graphic below. We
recommend to pre-drill all the holes so the wood does
not split.
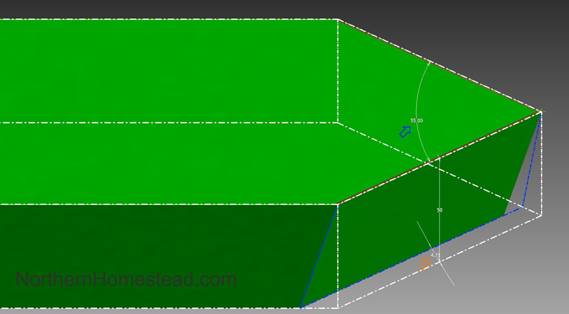
We assembled the
top off the dome separately and installed it as one piece. It was a bit heavy
and challenging.
Covering a dome
can be tricky because of the shape. Cutting the plastic for 3 facets in a row
worked the best. Acidome also calculates nicely the size of the facets, which
is especially important for more valuable coverings. With our free plastic
cover we simply laid the struts on the plastic and cut the 2-3 facets
approximately. Any overlaps we
trimmed with a utility knife.
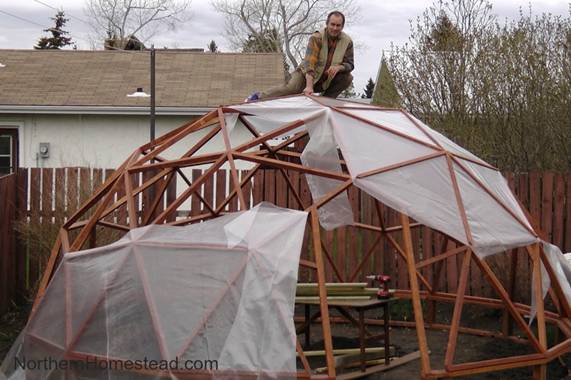
First we stapled
the plastic to the struts and then used the 1 cm planks to hold it in place
which also pointed out the structure of the GeoDome
even more. We like it :). You can also see in the picture how sturdy the
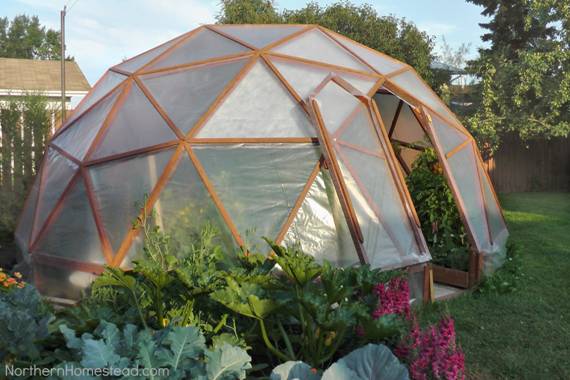
structure is! Read more about covering the GeoDome Greenhouse.
We built the door right into a pentagon, as you see in the picture it has
two vertical struts as door posts. We really like it that way. It does not
interrupt the shape of the dome, which is perfect especially in winter with all
the snow that just slides off the dome. It also allows us access to the dome
even with snow still on the ground, and in the summer it gives us an additional
opening at the bottom even if we have to close the door because of severe
weather which is a bonus, too.
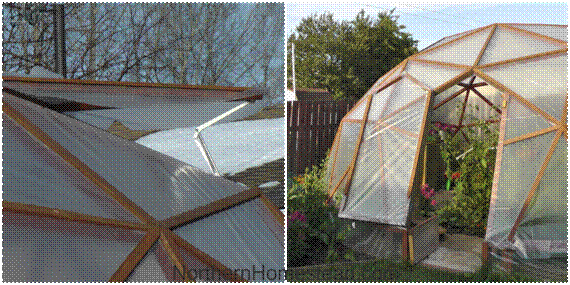
Our dome has two
windows, both with automatic window openers. However, if not using a cooling
system, two windows are not enough. We built the door and the windows from the
same struts as the structure and covered them with plastic.
Read more about
the GeoDome Greenhouse here.
We invite you to
subscribe to NorthernHomestead and follow us on Facebook orPinterest for the latest updates.
3K+
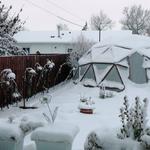 GeoDome Greenhouse in the Winter
 What greenhouse to choose?
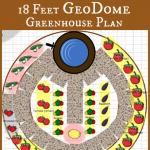 GeoDome Greenhouse Plant Arrangement
 Covering the GeoDome Greenhouse


Filed Under: GeoDome Greenhouse · Tagged: GeoDome, Greenhouse
1.
Fiona says:
March 6, 2013 at 4:03 PM
This is
fantastic information. Thank you Anna for posting so we can benefit from your
experience!
Reply
2.
smithspirations says:
March 6, 2013 at 8:14 PM
Wow! This looks
amazing! We aren’t very handy around our house, unfortunately, but I still
dream of putting together some kind of greenhouse someday. I never thought of
making a dome-shaped structure for one!
Reply
3.
Anonymous says:
May 9, 2013 at 5:44 AM
You know, I can
not thank you enough for sharing this information. This is literally a gift to
me; since you posted this on the exact same day as my birth day! I believe I
know of the “pricey” e-book you mentioned and my gut had told me to wait and
keep looking for the info. I needed to make this “bio-dome”. Again, thank you.
I would like to share this with others if you do not mind.
Reply
4.
Felicia Whitney says:
June 17, 2013 at 11:30 PM
hi i cant figure out how to use
the acidome web site i got
all my lengths for my struts all ready cut but i need
to find what degree angles i cut them at. and i cant seem to see it on acidome? please help i have been
researching the internet for two weeks and i keep
finding different answers and on your pictures i cant
see what the numbers where.
Reply
5.
Anonymous says:
July 1, 2013 at 12:36 AM
Can you tell me
please how warm does this thing stay in the winter?
Reply
6.
Jamie says:
July 12, 2013 at 12:10 PM
This looks like
a much better option then the makeshift greenhouses we put together this year. Pinning this for next
year:)
Reply
7.
Andrea @the Distracted
Housewife.com says:
July 12, 2013 at 7:43
PM
This is so cool.
I think we will be needing to make one of these!
Reply
8.
Debbie says:
July 28, 2013 at 5:47 PM
Just amazing…!
Thanks so much for sharing your geo- greenhouse with us!
It looks right at home in your backyard homestead… BTW…How fare
north are you?
Deb
Reply
9.
tessa says:
July 29, 2013 at 9:28 AM
This was
fantastic! We shared with our FB/Twitter readers at homesteadlady.com.
Reply
10.
Bee Girl (AKA Melissa) says:
July 29, 2013 at 1:34
PM
What a wonderful
post! I’ve seen these domes and felt incredibly jealous of those that have
them! How wonderful to have all the information to build one ourselves
now, thanks to you!!!
Reply
11.
Lisa Bertolini says:
October 29, 2013 at 4:48 PM
I wonder if
there’s a simple way to do this on a small space kind of scale just for herbs
during the winter? Would they last with the limited sunlight hours?
Reply
12.
NYDavid says:
November 19, 2013 at 9:32 AM
I found this site based on the inforamtion
you gave above. They seemed to have translated it into
English.
Reply
13.
 Kitty says:
January 16, 2014 at 1:10 AM
Thank you for
sharing these instructions. I’ve moved from southern California, to the Great Northwest, and
honestly, the only thing I miss are the citrus and
avocado trees. They would never survive a harsh winter here. I do miss having
potted dwarf citrus trees year round on the patio. My hope is to build a
greenhouse that will help (1 each) dwarf orange, grapefruit, lemon and a avocado trees happily survive & thrive, to bring homegrown organic fruits from garden, to kitchen.
Reply
14.
Dahlia Corella says:
January 20, 2014 at 12:53 AM
What I would
like to know is if this project could work with the stacks of pallets that I
have? I have a huge collection of pallets just waiting for me to “release” the
wood.
Reply
15.
simonthescribe says:
January 24, 2014 at 6:36 AM
Beautiful dome,
I really like the way you have jointed the struts direct rather than use
connectors. I have not made a 4v dome yet and may well use your plans for one.
I hope you don’t mind but I have put a picture of it up at my ‘make a
greenhouse’ website – with a link back to you of course.
Reply
16.
Rick Hantz says:
February 5, 2014 at 5:55 PM
My original 3
freq greenhouse was one more full level of triangles taller.
I then went to a 2 freq 8′ radius half sphere, which is pretty efficient
for a small greenhouse. All struts were made from 2×2 by 8 or 2x2x10 stock,
with almost no wastage.
I built a square, vertical doorframe for a 36′ wide aluminum storm door
where a pent hub would normally be.
Also, use white, water base stain –any oil base or dark stain eats plastic.
Reply
17.
Ivan says:
February 6, 2014 at 12:29 PM
Hi, friends!
how Cutting the struts radial arm sow ??? 55 degrees
for example.. it is very
accuracy !!
Who already made it ?
usually saw has a fixed angle 45 , 90 , 30
Reply
18.
Kafir says:
February 6, 2014 at 12:40 PM
I would love a
pre-made kit for this like the furniture you can buy at Ikea… 
Reply
19.
Mary says:
February 8, 2014 at 8:52 AM
I have an 18
footer that was a kit from Growing Spaces in Colorado. It has 5 layer polycarbonate
facets. It stays about 20 degrees warmer than outside. I am in zone 3 and I
grow amazing tomatoes in it. In fact we just finished eating the last ones that
we brought in the house to ripen. I will start new plants on March 1 to go out
by the end of the month.
Reply
20.
Richard Wakefield says:
February 8, 2014 at 9:30 AM
I have a geodome, bought from Growing Spaces. For it to be year
round it must have an insulated foundation, down 4 ft. It also needs some kind
of heater for cold winter nights. I use propane wall heater. With this cold
winter it’s consuming a lot of fuel. During the day, as long as there is sun,
it will heat itself between 20C and 30C in February. But this
winter hasnt seen much sun at all so far.
Reply
21.
Jim says:
February 10, 2014 at 10:34 AM
Thanks for
sharing your dome experience – I’m inspired!
Can you advise
on the tradeoff between 5/12 Sphere with pony wall
and 7/12 sphere without?
Also what about
all the options on the dome design site? How to choose to simplify
construction?
Thanks
Jim in South Carolina
Reply
22.
Daniel SIlva says:
February 14, 2014 at 1:19 PM
Hi! Greetings
from Azores! I want to build a greenhouse just
like yours! The problem here is the wind and I suppose this is the best shape,
wouldn’t it be? Could you tell me if the dome calculator gives exact number of
parts to use? Thank you!
Reply
23.
Kathi says:
February 18, 2014 at 8:36 PM
This is very
attractive. Has it stood up well against the wind and hail? Those are things we
would have to deal with here in Oklahoma
as well. Thank you for sharing this at the HomeAcre
Hop; I hope you’ll join us again this Thursday.
Reply
24.
lisa lynn says:
February 20, 2014 at 11:17 AM
Thanks so much
for sharing your awesome greenhouse on The HomeAcre
Hop! I featured it today Hope to see what else you’ve been up to!
Reply
25.
Jo Rellime says:
February 21, 2014 at 11:28 AM
Want one so bad
I can TASTE IT! I know Eddie could build this! Must talk to
him. I think we could do this by the end of the summer, no problem. Pinned it for him. Thanks!
Reply
26.
Niels says:
March 17, 2014 at 5:22 AM
Anna, Jakob,
Congrats with
the amazing greenhouse. We were also thinking of building one and are going
true the same process as you did: checking plans, tutorials etc.
If I’m correct
you used 5cmX5cm wood, right? Does that feel sturdy enough to you?
The only thing i don’t get in the plans are the L 80 something ° angles.
Could you explain that to me a bit clearer?
Anyway, amazing
greenhouse you have!
Niels
Belgium
Reply
27.
James says:
May 12, 2014 at 10:06 PM
how does one obtain all the information/blueprints to build
this?
Reply
28.
Lonnie says:
June 3, 2014 at 6:28 AM
1st off thanks for this info. I’ve been looking into this for some
time now. My question is at what angle do you cut for the top pony wall? I cant seem to find it for sure anywhere. I am thinking of
building that part with 2x4s 2ft high. I think I have all the struts figured
out from the postings.
Reply
29.
Taylor says:
July 18, 2014 at 11:00 AM
hey, great job, i was wondering how
long the struts you used are or how you can read it on the acidome
website?
Reply
30.
Oliver Hayward says:
August 11, 2014 at 1:04 PM
Hello,
I am trying to
build one of these, with some modifications. I have a compound miter saw, but am completely clueless with how to cut the
struts. I have been using acidome, but i do not understand how the numbers play into the way I am
supposed to adjust the saw. Im sorry but any help
would be greatly appreciated. I am trying to make a 2.75 radius 3V geodome (5/12) with 2×2′s, with a cone joint. (the beams
are actually 1.5 in by 1.5 in.)
Reply


